Rails on OpenBSD: Base System
First there was chaos, then came UNIX.
Welcome to the second installment in our series on deploying Rails to OpenBSD. The previous article laid out our goals and high-level architecture. This article focuses on setting up the base system and draws heavily from the afterboot man page. It’s seemingly mundane, but remember to never neglect proper system administration in favor of rushing straight to application stuff … unless you want to allow hackers to deploy their stuff, too.
We’ll talk about setting up DNS, securing root, creating a regular user account, setting up doas, disabling unnecessary daemons, setting up mail forwarding, and hardening OpenSSH. I assume the server is already up and running with OpenBSD installed. I use Hetzner, but you can use any provider offering OpenBSD.
Installing OpenBSD
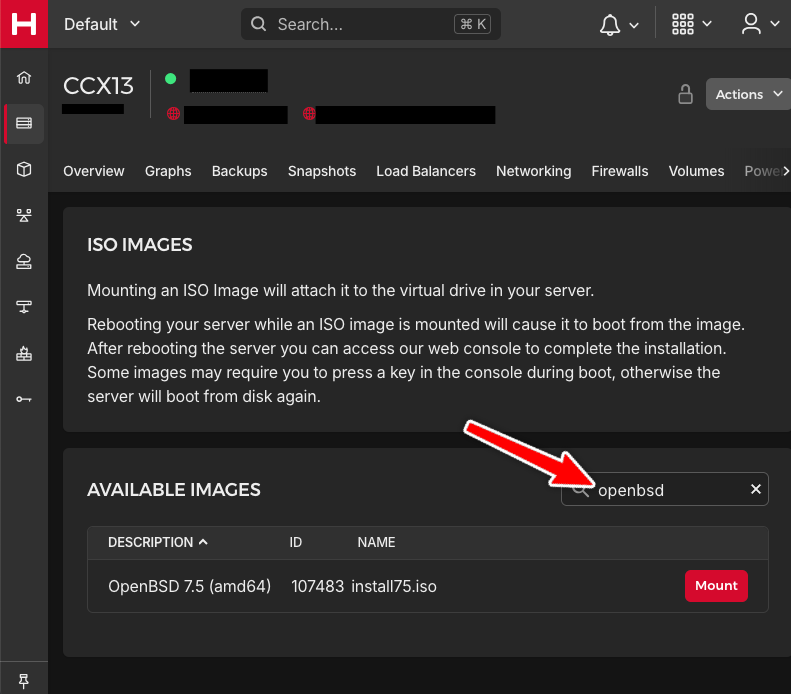
OpenBSD is unpopular among providers. I suggest looking up OpenBSD installation instructions for your provider, as it’s often often more complicated than “Pick OpenBSD from the menu”.
Luckily for me, Hetzner made it easy: go to “ISO Images”, search for “OpenBSD”, mount the image, and boot the server. This should trigger the installer. There’s also OpenBSD Amsterdam. I’ve never used them, but love their dedication to and support for OpenBSD.
Setting Up DNS
Our server is up and running, has a public IPv4 address, and optionally a provider subdomain. We’ll start with setting up a custom domain for the server. Personally, I own gregnavis.com and want to make the server accessible as server.gregnavis.com. We need to look up the public IP address that the provider assigned to the server and add it to as an A record on server.gregnavis.com. We should also set up reverse DNS to point the IP address back to our domain.
The Curse of High TTLs
DNS resource records are cached - a boon to performance, but a configuration headache. I recommend using a low TTL, like 60 seconds, when setting up DNS, so that there’s no need to wait for hours if a setting turns out to be incorrect. After getting settings right, remember to bump up TTLs to more reasonable levels.
DNS has been successfully configured if host server.gregnavis.com returns the right IP address. The next step is attempting to establish an SSH connection as root. Don’t worry about using root or password authentication – we’ll take care of that shortly.
The fully qualified domain name must be saved to /etc/myname, so that the right host name will be set automatically during boot. Update that file and reboot the server. Theoretically, we could skip the reboot and use hostname to change the host name, but rebooting allows us to test whether the right domain name is picked up during boot.
Connect to the server after it reboots and test the right domain is returned by hostname. If that’s the case then let’s proceed to the next step.
Test Before Moving On
Testing is an essential part of software development and the same is true for system administration. Whenever you’re making a change, confirm its effect before moving on.
Regular User Account
root password is set during installation. Since protecting root is critical for security, use a strong password. I suggest 30+ truly random characters stored in a password manager. In normal circumstances, it’ll be needed only to sign in to the web console to rescue the system in case it’s inaccessible over SSH. If you chose a weak password during installation, now is the time to change it via passwd. Remember to check the new password actually works by trying to open a new SSH connection before closing the current one.
Next, we’ll create a regular user account for everyday use: connecting to the server, issuing commands, and requesting elevated privileges when needed. Call adduser to create a user account interactively. If it’s run for the first time it’ll ask you a bunch of questions about your preferred defaults. You can use suggested answers here.
I called my account gregnavis, but use any name you like. Since this is an administrative account, it should be in the staff login class and to the wheel group. staff is less restrictive than the default class; the role of the wheel group will become clear in the next section.
What’s a Login Class?
Login classes are present in all three major BSDs, but are absent from Linux. Login classes are defined in login.conf and specify three things: allowed authentication methods, resource limits (e.g. CPU), and environment variables. OpenBSD defines a bunch of classes out of the box, including default and staff.
We’re going to use SSH key authentication, so now is the right time to copy the public key. ssh-copy-id can be used to copy the public key from our local machine to the server:
ssh-copy-id -i ~/.ssh/id_rsa.pub gregnavis@server.gregnavis.com
As always, the changes should be tested by attempting to connect to the server using public key authentication. Run the following on your local machine:
ssh -o PubkeyAuthentication=yes \
	-o PasswordAuthentication=no \
	gregnavis@server.gregnavis.com
The above ssh command receives two options: one to allow public key authentication; and one to disallow password authentication. If we’re greeted by the server shell prompt then we can proceed to the next step.
Elevating Privileges
A regular user account without a way to elevate privileges is useless for administrative purposes. su is one solution, but has serious drawbacks: no audit trail and having to type the root password frequently.
sudo is a popular alternative, but OpenBSD ships with a simpler tool called doas. It’s small and focused, so can’t be called sudo on steroids; let’s call it sudo on diet, then.
How Small Is doas?
Let’s try to quantify what “small” means here using sloccount. The results for doas are 630 lines of C plus 290 lines of YACC. In comparison, sudo seems humongous at 20k lines of C.
doas configuration resides in /etc/doas.conf. We need to put just one rule there:
permit nopass :wheel
That line means “permit (invocations) without asking for a password if the caller is in the wheel group”. The colon before wheel means it’s a group name, not a user name.
The best editor is …
… the one you can use! OpenBSD ships with three: vi (if you like Vim), mg (if you like Emacs), and ed (if you enjoy suffering). You can use them to make edits to configuration files. Alternatively, you can install a different editor from packages or use a tool like pocus to edit configuration locally using your favorite editor.
Naturally, our account must be added to wheel to make the rule match:
usermod -G wheel gregnavis
-G means “append the user to the following groups”. Don’t forget to test whether the change was successful: connect to the server using the regular account and run doas whoami. If the output reads root, then we can proceed to the next step. Remember that from now on, we’ll be using the regular user account plus doas when necessary.
Another Line of Defense
Adding our regular user to wheel has other security implications. If wheel is empty then su allows everyone to attempt to become root . If wheel is not empty then only its members can use su to become root. Don’t believe me? Then have a look at the man page.
Disabling Unused Services
OpenBSD ships various daemons out of the box. There are a few we won’t need, so stopping them will conserve resources, increase security, and decrease cognitive load of managing the server.
Let’s list enabled daemons by running rcctl ls on. Consulting man pages when necessary, we can tell that sndiod (sound input/output daemon) and slaacd (address auto-configuration daemon) can be terminated:
rcctl stop sndiod
rcctl stop slaacd
They should be absent from ps aux now. Additionally, to prevent their resurrection upon a restart, we must disable them, too:
rcctl disable sndiod
rcctl disable slaacd
That’s two daemons less to worry about! However, a careful look at the output of ps aux will reveal other unnecessary processes.
Disabling ttys
ps aux shows a handful of getty processes running in the background. They all can be disabled, except one used by the web console, which we’d like to retain just in case.
The web console TTY can be found in the server welcome line shown right after opening the console. For example, the message below indicates that ttyC0 is being used.
OpenBSD/amd64 (server.gregnavis.com) (ttyC0)

login:
Armed with that knowledge, we can edit /etc/ttys, where getty processes are defined, and turn everything off except for ttyC0. The beginning of the file should look like this:
console "/usr/libexec/getty std.9600"   vt220   off secure
ttyC0   "/usr/libexec/getty std.9600"   vt220   on  secure
ttyC1   "/usr/libexec/getty std.9600"   vt220   off secure
ttyC2   "/usr/libexec/getty std.9600"   vt220   off secure
(and so on)
The secure flag needs some explanation. If a TTY is marked secure, then it allows root log ins. We are leaving the flag on just in case we mess up the configuration so bad that we won’t be able to connect via SSH.
After these changes, init needs to be sent the HUP signal to trigger configuration reload:
doas kill -HUP 1
Does ps aux show just one TTY process? If so, let’s proceed to setting up mail.
Receiving and Sending Mail
Some daemons (e.g. cron) use local mail to deliver important information. If mail is left unattended then an important notification could slip through the cracks; alternatively, /var could fill up with heaps of unread messages. We want to prevent that by configuring aliases (to direct all mail to our regular user account) and forwarding (to send that mail somewhere we look daily, e.g. GMail). Let’s start with aliases, as they’re simpler.
smtpd is the built-in email daemon. Its configuration resides in /etc/mail/smtpd.conf, and by default sources aliases from /etc/mail/aliases. The default alias file has a section to fill in after installation. Here’s how it looks like after our edits:
# Well-known aliases -- these should be filled in!
root: gregnavis
manager: root
dumper: root
The above means “redirect root mail to gregnavis” and so on. Modifying that file is not enough: newaliases must be called as root to rebuild aliases.
As always, we’ll test the change before continuing. A test email can be sent using the built-in mail program:
echo "This is a test email" | doas mail -s "Test email" root
mail reads the body from standard input, which is provided by echo above; -s specifies the subject. If the alias works then gregnavis, not root, should receive the message. We can check that by running mail (without arguments) as gregnavis.
After having the alias set up, we can turn our attention to forwarding. Let’s start by creating a forwarding file for our user. It should be named ~/.forward and should contain the actual email address we want to send to. I used my work email hosted on GMail.
To make mail forwarding work, we need a set of SMTP credentials for the target domain. In my case, I created a dedicated application password for GMail, so that credentials used for different purposes are separated.
We can store the credentials in a separate file loaded from the main configuration file. Let’s create /etc/mail/secrets and put the following content there:
gmail contact@gregnavis.com:PASSWORD_GOES_HERE
gmail at the front is just a label used to refer to this set of credentials. It’s an arbitrary value; what’s important is that the same value is used in secret and in smtpd.conf. Since secrets stores credentials, we can make it owned by root:wheel with permissions of 0400 (read-only by the owner; no access for others).
The newly created secrets file must be loaded from smtpd.conf. The following listing shows my configuration, which is based on the default configuration:
# Load aliases. This comes from the default configuration.
table aliases file:/etc/mail/aliases

# Load secrets. This is our addition.
table secrets file:/etc/mail/secrets

# Only listen on a UNIX domain socket.
listen on socket

# The following two "action" directives define actions that can be referenced
# by later "match" rules. Think of them as method definitions -- they're defined
# here, but are actually called by a match rule.

# This is part of the default configuration and is used to deliver mail locally
# while taking aliases into account.
action "local_mail" mbox alias <aliases>

# The outbound action relays mail via the specified server. Note that gmail@
# below is NOT the SMTP user name -- it's the label of credentials to use
# during authentication. Ensure the same label is used here and in the secrets
# file.
action "outbound" relay host smtp+tls://gmail@smtp.gmail.com:587 auth <secrets>

# The rule below comes from the stock config and is used for delivering locally.
match from local for local action "local_mail"

# This is the rule that says: if mail is local and sent to contact@gregnavis.com
# then use the "outbound" action above to deliver it. Note that the real
# email address used below is taken from ~/.forward, so the presence of that
# file is essential!
match from local for rcpt-to "contact@gregnavis.com" action "outbound"
The last step is restarting the SMTP daemon via doas rcctl restart smtpd and sending a test mail via echo "Test mail" | mail -s "Test subject" gregnavis. This time the email should land in our real email account, and should be absent from local server mail.
We’re guaranteed not to miss any mail from the server, so it’s time to turn our attention to SSH.
OpenSSH
The default OpenSSH configuration in OpenBSD is secure, but I decided to introduce a handful of additional restrictions given only one specific user is going to connect using public key authentication. The following deviations from defaults were introduced:
- Non-standard server port was used; this is to reduce log noise from authentication attempts by bots.
- Only
gregnavisis allowed to log in. - A connection is given only 5 seconds to successfully authenticate.
rootlogins are disallowed.- A maximum of 3 authentication attempts is allowed.
- Password authentication is disallowed, and so are empty passwords.
- Agent and TCP forwarding are disabled.
The relevant settings from sshd_config are shown below:
# Move to a non-standard port.
Port 1234

# Only gregnavis is allowed to log in
AllowUsers gregnavis

# Each connection must authenticate within 5 seconds
LoginGraceTime 5

# No root logins allowed
PermitRootLogin no

# No more than 3 authentication attempts.
MaxAuthTries 3

# Password authentication is disallowed.
PasswordAuthentication no

# Empty passwords are disallowed; this is another defense layer in case
# password authentication ends up available due to a bug or operator error.
PermitEmptyPasswords no

# No need for forwarding.
AllowAgentForwarding no
AllowTcpForwarding no
These changes will become effective after restarting the SSH daemon via doas rcctl reload ssh. The validity of the configuration file can also be checked via sshd -G. Let’s remember to test the changes before closing the current SSH connection: open another connection to see whether it’ll be successful.
Lastly, I suggest you set up a convenience configuration for SSH. For example, here’s a fragment of my .ssh/config:
Host server
	HostName server.gregnavis.com
	User gregnavis
	PasswordAuthentication no
	Port 1234
This allows me to call ssh server and have SSH use the right username, host, name, and port number.
Closing Thoughts
We’ve finished setting up our OpenBSD by configuring DNS, securing root, creating a regular user account (including doas), setting up mail forwarding, and hardening the SSH server. It’s unexciting work, but work that’ll allow us to sleep well. The next article will cover setting up nginx and Let’s Encrypt for static sites. That setup will serve as the basis for a Puma-based Rails deployment. You can follow me on Twitter or leave me your email, so that you won’t miss the next part.
Enjoyed the article? Follow me on Twitter!
I regularly post about Ruby, Ruby on Rails, PostgreSQL, and Hotwire.